Editing Page Content
Please ensure you are using Mozilla Firefox to edit your site content, otherwise you will experience issues when editing.
- Dos and don'ts
Content | File Naming | Formatting | Headings | Images | Linking
Content
Do Don't Reason Store sensitive information such as meeting minutes on an appropriate network drive and/or email to appropriate people
Put sensitive local content onto the website Websites security is fallible;
Website content should be of broad interest so content intended for limited viewing should be distributed by other meansSeek written approval from the relevant people/organisations before publishing content
Put information, or images, on the website without copyright approval Legal copyright and privacy issues Consider the aims of the site and the needs of the website audience in determining suitable content for the website
Load all available content onto the website Enhances users ability to find what they are looking for Link to existing content presented elsewhere on the web Duplicate content on your site Minimises duplication and provides consistency of information;
Avoids content becoming out of date when the original source updates the content
File naming
Do Don't Reason Use lower case letters, and numbers, when naming files
Use capitals in filenames Avoids broken links in links and filenames as the University web servers are case specific Use hyphens and underscores to separate words. Note that search engines treat words separated by hyphens as separate words for searching
Put spaces in filenames Avoids problems in URLs when spaces are converted to code "%20"
Use generic filenames for files that are updated regularly (version dates can be included in the body of the document if it is required).
Rename superseded documents with a date in the file name and if no longer needed for reference, move to a backed up local drive
Include dates in filenames for files that are regularly superseded Allows files to be replaced by uploading the new version without changing links, minimising broken links and unnecessary workload
Formatting
Do Don't Reason Emphasise text using bold; italics can be used sparingly i.e. to emphasise/stress a word Italicise a whole sentence for emphasis Avoids confusion as underlining text on the web indicates that it is hyperlinked Use tables to present tabular information only
Use tables to structure the layout of a page Maximises accessibility by controlling layout with appropriate markup When copying text from another application, such as Word or a browser, use the paste as plain text icon on the editing toolbar to insert text on to the web page
Copy text from Word or other applications directly into webpages Avoids bad formatting which causes problems in the HTML coding of the page Back up old files on a local drive and/or burn them to disk
Use the web servers as an archiving method for files that no longer need to appear online Avoids old content being found by search engines leading to out of date or misleading information being available;
The University's limited web storage should be used for current content
Headings
Do Don't Reason Use the built in heading styles
Capitalise headings Maximises consistency;
Structural markup aids search engine visibility;
Minimises formatting effort so time can be spent on contentUse the heading styles in hierarchical order Use heading styles out of order Maximises accessibility, readability and consistency of structure Use text after the heading to create links Link headings Avoids confusion with non-underlined headings not appearing as links Apply the Heading 1 style to the title of the page only Apply the Heading 1 style to more than one heading on a page Maximises search engine ranking by identifying the as the first Heading 1 in a page is used to populate the page title
Images
Do Don't Reason Size images appropriately in an external editor before inserting them into a page
Use HTML to resize images To avoid image distortion;
minimise downloadUse images to provide additional information and clarification of the page content
Use images that don't enhance meaning Provides additional meaning and value for the additional download overhead Include an image description for all images used on your website Leave the image description empty Maximises accessibility by providing a text alternative for non-text content
Linking
Do Don't Reason Link between one and five words
Link whole sentences Maximises readability Link meaningful words, such as the name of a document, or target content Link phrases such as ‘click here’. Maximises accessibility. The link text should make sense when read out of context Link on the name of a site or page
Link full URLs Maximises readability Link the titles of documents in the content area of a webpage Include links to PDFs, Word files or Excel documents in the navigation menus Avoids confusion by providing consistent behaviour of menus Open all links in the current window, allowing you to navigate back using back button Open links to external sites in a new window Promotes consistency of the browsing experience;
Maximises accessibility - Editing access and log in
To make changes to your website, you must have been granted editing access by the Web & Digital Team and must be accessing the development server from within the University's firewall (security that blocks unauthorised access). This means that your computer must be located either within the University network (i.e. on campus) or you must be using your staff/student dialin or VPN. University staff, students and people with visitor access are able to make updates to a website.
Note: you can access your development website from home or elsewhere outside of the University's campuses by connecting to the University network via Virtual Private Network (VPN).
You can find your website on the development server by using WebAccess:
- Log In to WebAccess using your university ID and password
- If you only have editing access to one website, the site should appear on screen. If you have access to two or more websites, search for, and click on, your website name.
Please note: if you are searching for a sub-site, you will be taken to another page displaying all sub-sites within the main site. Click once on the relevant sub-site name. - On the page displaying your website information, click on the first URL in the Development section
- The website that you want to edit should now appear on your screen.
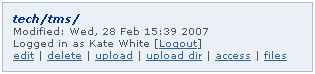
When browsing through your website on the development server, two boxes will be displayed at the bottom of the page that show functions that may be performed on pages throughout the site. Initially the top display box will only allow the option to login.

Click on the log in link and enter your university ID and password to gain access to the maintenance functions.

The top blue display box will then change to show the allowed options including: edit, upload, access and files.

- Web pages
Browse through the site to find the page that needs changing and then click on the edit link in the maintenance options box.

The page will be redisplayed with the editable content in a smaller scrolling box. Above the content area is a toolbar, showing icons similar to those in Microsoft Word. These icons enable you to make a number of changes to the content.

Making changes is similar to editing a document in Word. The text content of the pages can be changed by using the icons to bold and italicise text, align your content to the left (as standard) and use numbered or bulleted lists if required. The page content can also be enhanced by creating links, using tables or inserting images where appropriate.
Mathematical equations can be inserted by visiting the mathURL website and follow their instructions to generate an image. Also refer to their help page for information on embedding generated images.It is also suggested that you give the image a description. E.g. cos squared x plus sin squared x is 1 would be the descriptive text used for this image:
 .
.To include superscripts in your webpage you will need to edit the page code and explicitly enter the mark-up for superscripts. The superscript mark-up is <sup> and </sup> for the beginning and end of the superscript, respectively, e.g., to show x2, you would need to enter the following into the code: x<sup>2</sup>.
- Pasting text from other documents
Copying and pasting content from other programs, such as Word documents and emails, is pasted as plain text by default. This means that the other programs' formatting is not transferred with the text.
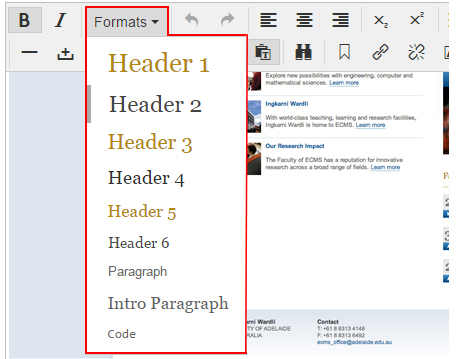
You can paste your content in and then style it accordingly, using the Formats dropdown menu:
Please note: tables created in Word cannot be pasted in to your webpage. You can however create an empty table in TMS and then copy the text within each table cell and paste into the desired cell on your editing page.
- Headings
The best way of formatting text to ensure your page is accessible and looks professional and consistent with other University of Adelaide webpages is to apply a heading format.
Heading formats are applied to the whole of the paragraph where your cursor is located by selecting one of the heading options from the drop-down list highlighted below.
The basic format applied to the majority of the text is the paragraph format. The heading options available are Heading 1 through to Heading 6. These have predefined styles set for the templates.
The main heading for each page, except for the homepage of your website, should be defined as a Heading 1. The Heading 1 should only be used once on each page. The "Intro Paragraph" format is also used once per page, directly below the Heading 1.
All other headings in the page must use Heading 2 through Heading 6, in descending order, without skipping any numbers. This is important to comply with accessibility guidelines.
- Tables
Tables are recommended for presenting tabular information within webpages, and TMS has a number of inbuilt features allowing tables to be simply formatted and maintained.
- To create a new table, move the cursor to the point in the page where you want the table to be displayed and click on the icon to Insert a new table (see below).

- A pop-up window will then be displayed that allows the table parameters to be specified (i.e. number of columns and rows).
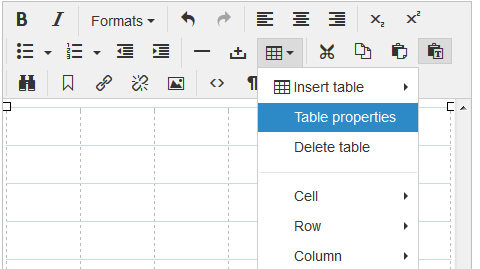
- Table widths should either be left blank to allow the browser displaying the page to determine the ideal width for displaying the tabular information, or if necessary, a percentage width can be specified to enable tables to be displayed in a consistent style, e.g. a width of 80% will force the table to be displayed across 80% of the window width. It is not recommended that exact pixel widths be specified as these are not likely to display well for all end users.
- All tables will be automatically given a class of “light” which adds our standard table styling. If you are using the table for layout purposes and wish to remove the styling, please select a class of “None” from the class drop-down list in table properties.
- Click Insert to add the table shell to the page.
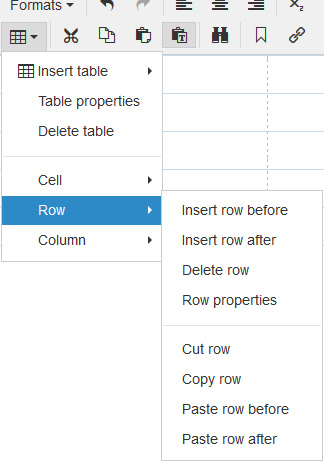
- Table cells and rows can be formatted in the cell and row sections of the table menu. You can place your cursor in the appropriate cell and navigate to these sections via the table icon. Otherwise you can right click your mouse in the relevant cell, and a table menu will appear.
- The cell type can be specified as either a data cell or a header cell, and the formatting applied to the cell can be changed by selecting your preferred option from the class drop-down field.
- By using the other table icons, you can also add or delete rows or columns and cells can be merged and split as required.

Note: Clicking on an existing table will enable options for updating the table to become active. The table style or width can then be changed by clicking the table icon and changing these values.
- Saving changes or exiting the edit window
Save Changes
When a page is being edited, it is locked on the server so that no other users can make changes at the same time. At the bottom of the editing page are two buttons which give you the option to Preview (and then save your changes) or Cancel. To unlock the page when you have finished editing or if you decide you no longer want to edit, it is important to exit from the page using one of these options.
- Click the Preview button at the bottom of the editing page
- Check the displayed preview page to ensure you are happy with the changes, but DO NOT check links at this time as the page is not yet saved. The following options are displayed at the top of the preview page
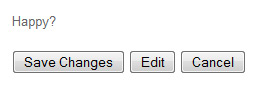
- Click Save Changes: if you want to accept the changes you have made to the page and exit
- Click Edit: if you want to return to the edit window and make more changes
- Click Cancel: if you want to lose your changes to the page and exit
- If you decide to Save Changes, this means that the page is saved on webdev, the development server. You can then:
- Check all links in the page to ensure they are working correctly.
- Upload it to the live website if you are happy with the page and are ready to put it live.
Cancelling or Discarding Changes
Clicking the Cancel button will exit you from the editing window and any changes will be lost. This is the option to use if you accidentally click edit on the wrong page or if you want to discard changes you have made.
Note: Please do not exit from the editing page by closing the browser window or using the back button.
- Uploading pages/files
To make the changes appear on the Internet, you need to upload the page/file to the live production server.
Please note that it is important to fully check the page BEFORE uploading to the live site as once the page is uploaded it is visible to the outside world.
Uploading a page
The simplest way to upload a page is to click on the upload link in the top blue editing box at the bottom of the page you have just edited.

This will display a message asking you confirm the upload. By clicking OK, this will upload only the displayed page to the live website.
Note: It is important to remember to also upload any new or updated documents that are linked to on the page (e.g. upload both the page and the document) otherwise the links will appear broken.
Uploading a file
To upload a file, click on the files link in the top blue editing box at the bottom of the page to display the files for the current folder. Navigate to the file which you wish you upload. You will see options available alongside each file in the folder. Choose the upload option next to the file you wish to upload.

- Restricting access
Follow the instructions below to restrict user access to your selected website content.
Instructions
Login to webdev on the site you would like to add access restrictions to. Navigate to the particular page you would like to restrict access to. If you would like to add access restrictions to the entire site, then do this on the homepage.
Once logged in, at the bottom of the page click on the link titled access.
A form page will then be displayed with the link Edit Access - allowing you to specify who should be given access to the site. The options are as follows:
- Anyone: no access restrictions on the folder
- Staff: people considered staff or visitors of the University of Adelaide for the purposes of LDAP authentication can access the folder. This may include contractors and visiting academics.
- All Students: only students of the University of Adelaide can access the folder
- Postgraduate Research Students: only postgraduate research students can access the folder
- University of Adelaide: any person with an entry in the University of Adelaide LDAP can access the folder (this includes staff, students, external, etc.)
- User list: a specified list of LDAP user IDs can access the folder
- Department list: people who are members of a specified list of HR department numbers can access this folder. Your department number is presented by the dialog.
- Esoteric credentials: anyone who knows the password set for the page/site can access that restricted section. You have the option of setting a username, or leaving it blank. Please see the information below for details on setting up esoteric credentials.
Click the check box for the types of access you want set. If you select more than one, then anyone who meets any of the given criteria will be allowed in.
To set the access, click Save Changes.
NOTE: Before the access restriction will take effect, you must upload the relevant folder to the live site. You can do this by going to Site Files in WebAccess, finding the relevant folder and checking the box next to the name and clicking Upload Selected.
Setting up esoteric credentials
It is mandatory that when you set up esoteric credentials that you also tick the "User List" option and add anyone's LDAP user ID that maintains the website and/or needs to edit the contents of this page. If you do not do this, you will in turn, restrict your own access to edit this page as it creates a loop.
- Unlock a page
When you edit a file in TMS, the file is automatically locked on webdev so that no one else can change it at the same time. The file will stay locked until you either preview and save changes or cancel. If you exit from the page in another way, you can redisplay the page and click the unlock link.
If another user has left the file locked, please contact the Web & Digital Team to unlock the file.
- Deleting pages
If you need to delete a page, file or folder, please contact the Web & Digital Team.